Overview
Collect date and time information to know exactly when data was collected or submitted in the field. Date/time capture helps you ensure validity and enhance record-keeping. Have form respondents select the date/time manually or set up date/time stamps to automate the process.
How to Set up Date/Time Capture
There are multiple ways to capture date or time values from form respondents.
For one, FastField captures the date and time when a form submission is received at the server. The date and time captured at the server will be stored using the time zone information as dictated by the time zone settings for the user's account.
Other ways to capture date or time values are as follows:
- Add the Date/Time field for user selection.
- Enable automated Date/Time Stamps on specific fields.
- Enable Date/Time Overlays on photos.
Add the Date/Time field for user selection
- In the Form Builder, select Date/Time from the field menu.
- Under the Date/Time Settings, choose the format (date or time) & customize any other settings (see the configuration guide below).
- When published & dispatched, users can then easily select the date/time from a dropdown menu.
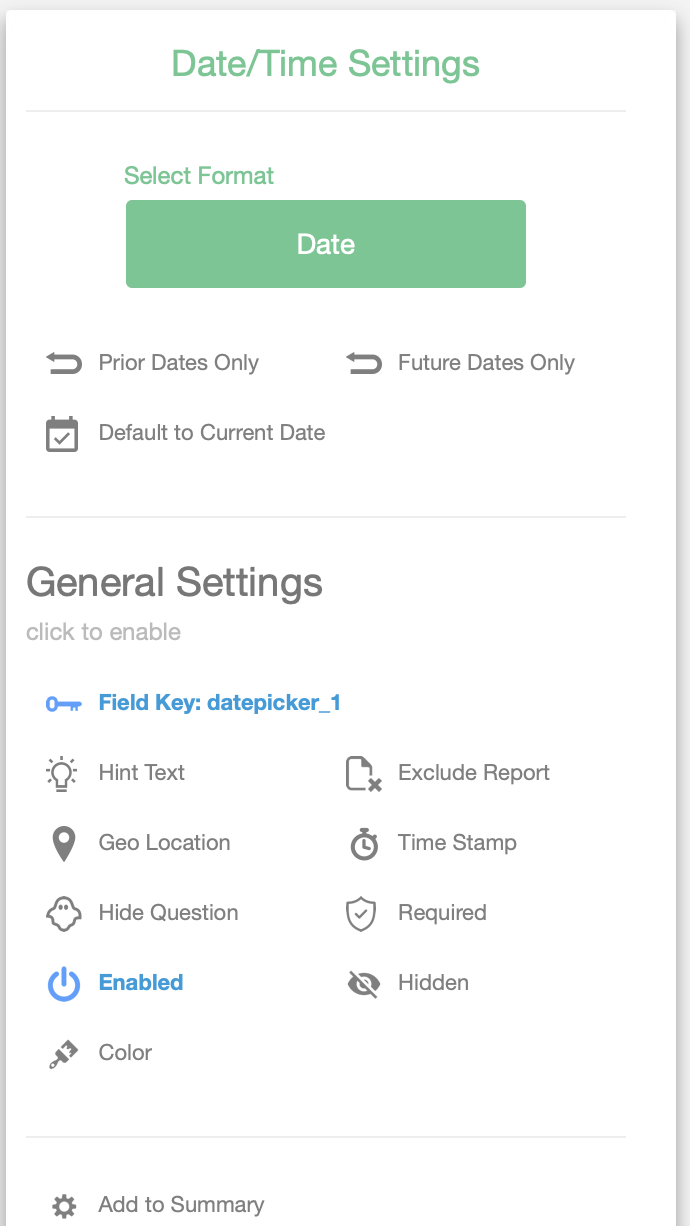
Configuration
| Setting | Description |
|---|---|
| Field Label | The label displayed for the field. This is usually displayed at the top left corner above the field. |
| Field Key | A Key used to reference the field in submission data. The key is also used to reference the field in rules and calculations. |
| Capture Mode | Indicates if this field will capture date or time values. |
| Default Value | The default value to set for the field value. Available Options: Current Date, Current Time |
| Hint Text | The text that is displayed if the field has no value set, e.g. Please enter a value |
| Time Only | If set the field will only be used to set a time value and not include the date. |
| Allow Only Future Date | If set the field will only accept values that are greater than the current date. |
| Allow Only Prior Date | If set the field will only accept values that are prior to the current date. |
| Rules | A Rule or JavaScript snippet that allows you to perform actions on fields or sections within the form. The actions can include hide, show, enable, disable, showSection and hideSection. Rules are executed on field value changes and when the form is opened. ex. if ($field1$ > 23) { hide(); } else { show(); }(Please see the Introduction to Rules Document for more information) |
| Required | Sets the field to have required input. You will not be able to submit the form until this field has valid input. |
| Enabled | If not set the field will be visible but cannot be edited or set to accept new input. |
| Hide Label | Hides the Field Name label. |
| Hidden | If enabled the field and all labels are not visible. |
| Exclude From Reports | If checked, the field will be excluded from HTML and PDF reports and will also be excluded from Excel and CSV exports. |
| Capture Geo Location | Capture the current latitude and longitude when the acknowledgment button is clicked. |
| Capture Time Stamp | Capture the current date and time when the acknowledgment button is clicked. |
| Alert Type | Choose a theme to change the background and font colors of the field cell as displayed in the apps. |
Result Data
| Data Type | Domain of Values | Example JSON |
|---|---|---|
| String of the date in ISO 8601 date format | Any valid date and time in an ISO 8601 String | { "datepicker_1": "2014-06-10T12:28:02.000-4:00" } |
Enable automated Date/Time Stamps on specific fields
To indicate the time and date of data entry on individual fields throughout the form:
- Add a field to your form.
- Select the time stamp icon to the right of the field name on the form or select Time Stamp under General Settings.
Enable Date/Time Overlays on photos
You have the option to place text with a date/time overlay on photos taken with both the single and the multi-photo fields.
To add text with a date/time overlay:
- Add a photo field (single or multi) to your form.
- Add a text field (regular or long). This will allow the user to write a caption that will be displayed on top of the photo.
- Select Photo Overlay in the settings panel on the right.
- Enter the field key of the text field that you wish to use as the overlay. In the example below, alpha_1 is the basic text field that will be used as the overlay.
- Select Show Date/Time Stamp in the same Field Key Overlay window.
On the app, users must enter their caption before taking the photo. If the text is written after taking the photo, the overlay will not be displayed on the photo.
*Note: This feature is not compatible with Embedded Photos. It will only work for photos captured in the app and will not work with photos uploaded from your device.
Changing Account Time Zone, Date Format, and Time
- Log in to the Portal as a user who is assigned to the Admin role.
- Navigate to the Company Settings section.
- Choose the appropriate time zone for your account from the Default Time Zone dropdown.
- Choose the date format you want from the Default Date Format dropdown.
- Choose if you want a 24-hour or 12-hour clock with the 24 Hour Clock checkbox.
- Select Save.
Date Format in Repository
All date and time data in the FastField vault is stored in ISO 8601 string format. The ISO 8601 format allows for lexical sorting and better portability between systems. An example of this format is shown below:
2011-08-07T01:44:53.376Z
*Note: Customers who leverage the direct POST integration capability of FastField or have chosen to receive form submission data in JSON format will receive data and time data in the ISO 8601 format.
Advanced Applications
Calculating the Time Between Time Fields
You can use a Computed Label field to calculate the time difference between two time picker fields. In the example below, we have a time field with the key "time1" and another with the key "time2".
In the example below, we calculate the total hours between the two date values. You can adjust the formula to convert to minutes, seconds, or days according to your needs.
*Note: You will need to replace the $time1$ and $time2$ fields with your own Date Selector field keys or the script will not work.
ADD THIS TO YOUR CALCULATION FIELD
var date1 = dateFromString($time1$);
var date2 = dateFromString($time2$);
var hours = Math.abs(date2 - date1) / 36e5;

return hours;

function dateFromString(isoDateString) {
  var parts = isoDateString.match(/\d+/g);
  var isoTime = Date.UTC(parts[0], parts[1] - 1, parts[2], parts[3], parts[4], 0);
  var isoDate = new Date(isoTime);

return isoDate;
}
Calculating the Difference in Years Between Two Date Fields
To calculate the difference in years between two dates you will need to use a computed label field. A sample script is provided below:
*Note: You will need to replace the $date1$ and $date2$ fields with your own Date Selector field keys or the script will not work.
ADD SCRIPT TO A COMPUTED LABEL FIELD
var date1 = dateFromString($date1$);
var date2 = dateFromString($date2$);
var dateDiff = new Date(date2 - date1);

var yearDiff = Math.abs(dateDiff.getUTCFullYear() - 1970);

return yearDiff;

function dateFromString(isoDateString) {
 var parts = isoDateString.match(/\d+/g);
 var isoTime = Date.UTC(parts[0], parts[1] - 1, parts[2], parts[3], parts[4], parts[5]);
 var isoDate = new Date(isoTime);

return isoDate;
}
Forcing Decimals on Calculation Fields
By default, calculation fields will shorten any decimals with "0" on the end of a number.
If your value is: "1.20"
It will shorten it to: 1.2
Sometimes, however, you will want to force it to display the "0" at the end. To do this, we are going to have to use the "toFixed()" method.
*Note: For Android devices, you are required to put a character in front of the result for it to be left as a string and keep the decimals (see example 2)
• Example 1
var example = decimal($numeric_1$,0);
example = example.toFixed(2);
return example;
• Example 2
var example = decimal($numeric_1$,0);
example = example.toFixed(2);
return "$ " + example ;