Overview
When you send an email through FastField, such as a notification or submission report, it will be sent from this default address: noreply@fastfieldforms.com. However, it is possible to customize this From email address, as well as a Reply-To address to allow any responses to be sent to an email address of your choice.
Please follow the guide below for instructions on how to set this up on your account. If you have any questions or concerns please feel free to reach out to our team.
How to Set Up the Reply-To Email Address
- In the Portal, go to Account > Company Settings.
- Go to the Email Settings tab and scroll down to All Email Setup.
- In the Support Reply-To Email field, enter the email address you want recipients to send any replies to.
How to Set Up the "From" Email Address
It is possible to set up FastField as an authorized sender, allowing you to change the "From" email address. This will require you to have a custom domain, as you will need to modify the CNAME records on your DNS server. Generic emails, such as gmail.com or yahoo.com, will not be able to complete this optional setting.
Note: To set up a custom From email address, you will need to have access to add CNAME records to your DNS.
- In the Portal, go to Accounts > Company Settings.
- Go to the Email Settings tab and scroll down to All Email Setup.
- Just below the Reply-To Email field, select Begin Setup to begin the custom From email address setup.
- In the Domain field, enter your domain you'd like to use to set us up as an authorized sender, for example, fastfieldforms.com.
- In the From Email Address field, enter the email address you want to use for the custom From email address (e.g., noreply@fastfieldforms.com).
- Select Create Custom Email Domain.
- You will now need to add the CNAME records to your email server.
- Once you update your server with the required CNAME records, select the blue button to validate your domain, completing the process to make FastField an authorized sender to send an email on your behalf.
Advanced Settings: Custom DKIM Selector
This is an optional setting. There may be a scenario for some accounts where you may already have CNAME records registered with Sendgrid, our email sender. If this is the case, when trying to register with us, it would create a set of duplicate records (and your DNS won't like that).
To set this up click on the button that says "Show Advanced Settings":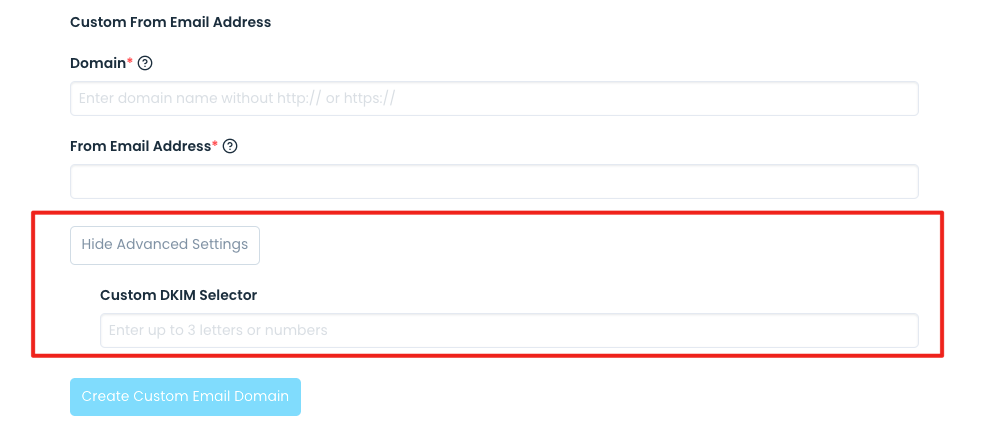
- Under Custom DKIM Selector, enter up to 3 letters or numbers.
- After you put in your DKIM selector and fill out your domain and From email address, select Create Custom Email Domain and it will create your CNAME records with your desired DKIM selector.