Overview
The SQL integration option allows you to send your form submission data to a Microsoft Structured Query Language (SQL) Server database. This integration can allow for more advanced data management capabilities and interoperability between FastField and other applications that use SQL.
*Note:
- We no longer support TLS 1.0 or 1.1 connections. Please make sure you are using TLS 1.2 or greater on your SQL Server.
- We do not support MySQL or PostgreSQL database
How to Set Up the SQL Integration
- Finalize your form.
- It is recommended that your form is finalized before mapping to your SQL Server database tables. If you make changes to your form after you have mapped to your tables, you will have to manually add/edit database columns. This can also result in data not being inserted into your tables if your form changes and your mappings have not been updated.
- Generate your Database Table Creation script and assign User Permissions (optional).
- You can skip this step if you would like to map your form to existing tables in your database and permissions have already been assigned.
- To create new tables in your database, click the Copy button to copy the table creation script.
- This script will need to be executed manually using a tool of your choice. You will also need to modify the login and user creation commands at the top of the script to match the user accounts in your database.
- If you do not wish to create a new user, you can remove these commands from the script. The final statements in the script assign the appropriate permissions to the tables so that the user you specify has the authorization to perform insert commands on your tables.
- By default, the fields are generated using their field names. You can choose to re-generate using field keys as the names by clicking Re-Generate Using Field Keys.
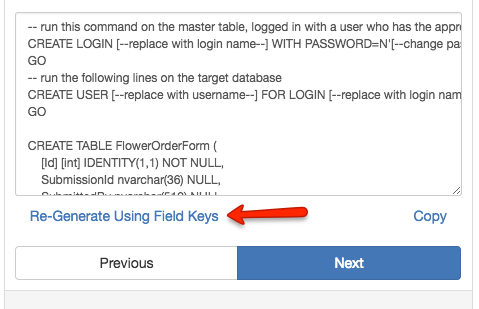
Example script:
-- run this command on the master table, logged in with a user who has the appropriate privileges
CREATE LOGIN [--replace with login name--] WITH PASSWORD=N'[--change password--]'
GO
-- run the following lines on the target database
CREATE USER [--replace with username--] FOR LOGIN [--replace with login name above --]
GO
CREATE TABLE FlowerOrderForm (
[Id] [int] IDENTITY(1,1) NOT NULL,
SubmissionId nvarchar(36) NULL,
SubmittedBy nvarchar(512) NULL,
SubmittedOn datetime NULL,
FormName nvarchar(512) NULL,
FormVersion int NULL,
DisplayReferenceValue nvarchar(4000) NULL,
DispatchId int NULL,
SequenceNumber bigint NULL,
StartFormTimestamp datetime NULL,
EndFormTimestamp datetime NULL,
LookupList nvarchar(4000) NULL,
ItemNumber nvarchar(4000) NULL,
Price nvarchar(4000) NULL,
Color nvarchar(4000) NULL,
Quantity numeric NULL,
Calculation nvarchar(4000) NULL,
CONSTRAINT [PK_FlowerOrderForm] PRIMARY KEY CLUSTERED ( [Id] ASC ) )
GO
GRANT VIEW DEFINITION ON FlowerOrderForm TO [-- replace with username above --]
GO
GRANT INSERT ON FlowerOrderForm TO [-- replace with username above --]
GO
- Add your server and login information
- Add the Host/Server (The IP Address of your SQL server database instance). Note that the address must be accessible from outside your network.
- Add the Port Number of your SQL server database instance.
- If you wish to disable certificate validation, fill in that checkbox. When checked, the SQL Server certificate will not be validated (i.e., self-signed certificates will be valid). When unchecked, only CA-issued certificates are valid.
- Enter the name of your SQL server database instance.
- Enter the Username and Password.
- Note that the user must have View Definition and Insert permissions on any tables referenced in the mapping.
- If there is a Firewall in place, all connections to your database will be coming from the following IP Address: 40.85.162.76
- Once you have finished, click Save and it will try to connect to your SQL server.
- Map Your Form Fields to Your Database Columns
- Now you need to map your fields to your tables (assuming you have already created them in SQL).
- Each entity in your form (Master Form, Subforms, Repeatable Sections, Multi-Select Lists, Multi-Photos) can be mapped to an individual table. This allows you to deliver multiple instances of data, which are translated to multiple-row database tables. Each entity table can be referenced back to the Master Form table using the Submission ID.
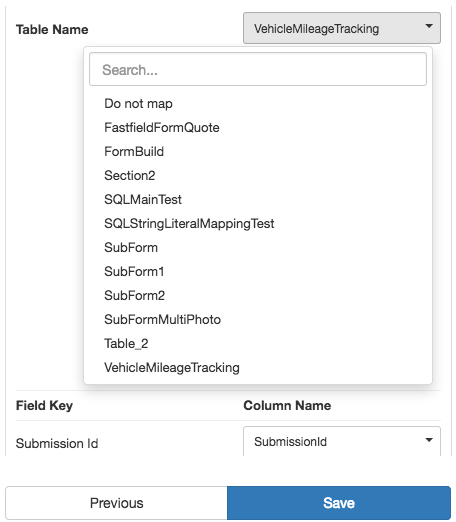
- Select your table, and then proceed to match each field to the corresponding column name.
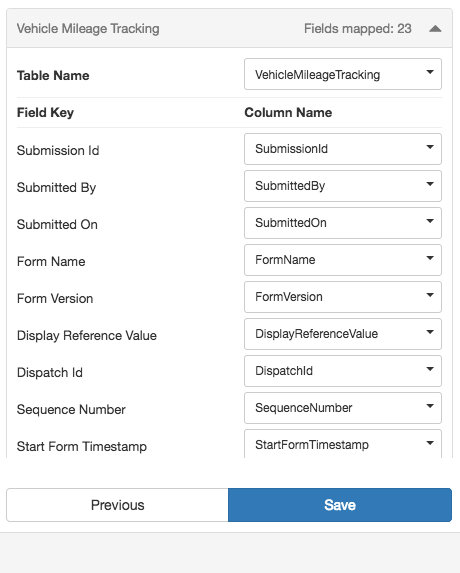
- Click Save to finish your SQL integration.
To set up an SQL Server integration in Global Workflow:
- Click on the Global Workflow tab on the left navigation menu in the Portal.
- Select Integrations.
- Select Send to SQL Server
- Enter the following information:
- Host/Server
- Port
- Database
- Database Schema (optional)
- Username & Password