Overview
Subforms are reusable forms that can be added to your main forms via the Subform selector field. Subforms allow for a more straightforward form setup when you need to capture repeating instances of the same type of data.
An example of this is an order with line items. In this scenario, you could create a reusable subform representing one line item. Then, you could add that subform to your order form via the Subform field in the Form Builder. When filling out the order form in the app, users would be able to repeat that subform as many times as needed as they enter their data.
How to Create a Subform
- Log into https://portal.fastfieldforms.com using your administration username and password.
- Open the main form you want to add the subform to in the Form Builder.
- Add the Subform field to your form.

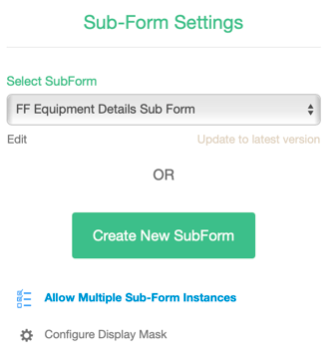
- On the right-side panel, you can choose an existing subform or create a new one by selecting Create New Subform.
-
- If you're creating a new subform, give it a name and select Edit to build your form.
- Save and publish the subform to make it live for use.
-
- Select Allow Multiple Subform Instances to enable users to repeat the subform within the main form as needed to capture multiple data instances.
Your subform should look similar to the screen below:

From this point, you can configure the subform field as needed. For details on the different options to configure a Subform Selector field.
Use the Subform Selector to launch Subform from the Master Form. The Subform selector field will prompt you with a list of your created Subforms to choose from or create a new one from scratch. Subforms are most commonly used to capture several instances of data within a single form submission.
Note: A subform must be created before a Subform field can be added to a main form.
Notes and Limitations of Subforms
Please reference the following notes and known limitations of using subforms in FastField:
- Subform fields cannot be added to a subform (i.e., subforms do not allow infinite nesting of data).
- Subforms do not contain pages in their organizational structure.
- Subform data contained in form submissions cannot be exported to CSV format.
- Custom reports (Word or PDF) do not support repeating sections within subforms or subforms within repeating sections. We highly recommend either using repeating sections or subforms (please refrain from using both at the same time).